|
Class 2
Topics:
|
|
|
Principles of Good Web Development
- File Organization:
In order to create web sites, we need to understand
the basics of file organization or file management.
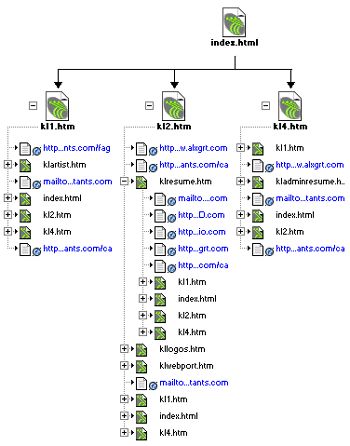
Think of the pages of your site as the building blocks of a pyramid.
Where, the the top granite stone is your home page (always index.html)
and below are the pages that make up your web site. Another analogy
refers to a root system of a tree. Where your home page (index.html)
is the base of the tree and the pages that make up your web site
are branched out below, all connected by internal links. See Fig.#1.
 fig.#1 fig.#1
DW4 will handle the more intricate details of file management,
but you need to first understand and set up a your file Hiearchy.
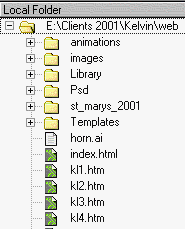
You will need to make new folders that will hold the various elements
of your pages (image, animation, CSS, etc.) things up and know where
to save the objects and element of your site.
 fig.#2
When uploading your site files and folders to a server, for viewing
on the Internet, you need to ensure you create the same file hierarchy
on the server as was created by DW4 and you, locally. DW4 can handle
uploading your files correctly as long as the hierarchy has been
initiated correctly on the server.
- DW4 Makes it Easy:
- Defining a Site:
- By Defining a site, you let DW4 know where the files for
that site are located, locally. DW4 will store any files you
create as you develop the site in the same area. DW4 will
even develop folders to hold certain information, as it needs.
- Show Site Map:
- By showing the sites development through a site map (see
Fig.#1), DW4 assist you to understand how the site is being
developed and layed out.
- A site map, viewed in DW4, will tell you, locally, how your
site is layed out, if the links are connected to the right
pages, if email links are connected correctly and more.
- View your site map as you develop your site to ensure you
are following the plan of the site.
|
|
|
Dreamweaver Basics (Chapter
2 - Dreamweaver 4)
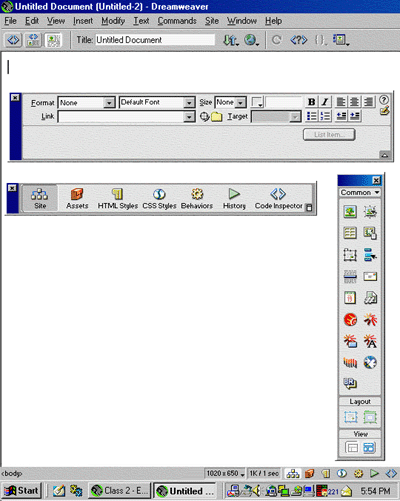
- Work Area:
- Toolbar:

- Contains buttons to assist viewing, giving information
and for editing your document.
- Code View: View the HTML code of the
current document.
- Code and Design View: View both the
code and the design.
- Design View: Most popular view for
editing in DW4.
- Document Title: View/edit your document
title.
- File Status: For setting up File Transfers
to your server.
- Preview in Browser: Click to preview
the document in browser.
- Refresh: Allows you to refresh your
document locally.
- Reference: Opens DW4's Reference window.
- Code Navigation:
Quick access to your coding.
- View Options: For setting document
window options.
|
|
- Objects Panel:
- Floating panel contain
buttons for editing, creating and inserting objects into your
web page. Window > Object.
- Contain seven (7) Categories:
- Character: Special character.
- Common: For creating and inserting
common elements.
- Forms: For creating and inserting
Form elements.
- Frames: For creating and inserting
Frames.
- Head: For adding various Head tag
elements.
- Invisible: For creating and placing
invisible elements.
- Special: For creating and inserting
Java applets, pluggins, AxtiveX objects.
- Views: There are two view
choices when creating documents.
- Standard: most common for standard
HTML layout.
- Layout: for doing document layout
with an image as a transparency / and for creating tables.
- Context Menus:
- For quick access to commands and properties
related to a current selection, just right click on the document
window and a popup Context Menu will appear.
- Document Window:
- The main body of the screen, designated for
editing and viewing your document.

The Status Bar (bottom of the Doc. Window) contains:
- Tag Inspector: displays tag on current
page.

- Window Size:
popup for changing display.
- Document Size: an estimation of
the doc size and download time.
- Launcher Bar:
permanent home of the Launcher Bar.
- Property Inspector:

- Lets you examine and edit properties for the
currently selected page element.
- Is context sensitive, depending on the element
selected.
- Click the Extender arrow to expand or contract
the panel.
- Launcher Bar:
- Contains buttons for opening and closing various
panels, windows and inspectors.
- These are also found at the bottom right of the
document window.
- Tag Selector:
- Displays the HTML parent tags.
- Window Size:
- Allows you to view the document window from a selection of
predetermined sizes, temporarily.
- Connection Speed:
- Once the connection speed is set in Preferences Edit >
Preferences these figures give you vital information about the
current page. 32K (document size) 9 sec (suggested download
time for current setting).
Other Panels: Window > ....
- There are several useful Panels available for editing, creating
and inserting object in your document.
- You will get to know more about these as we progress.
Colors: Many of the dialog boxes from the Property Inspector
contain Color Drop Down boxes. These allow you to choose a color for
a selected element with the Eyedropper tool.
- Click the dropdown arrow to select a color from the 216 colors
available web safe colors.
- Once the dropdown has been selected you can click any where in
the document window to select a color with the Eyedropper (your
cursor will change into the Eyedropper).
- Colors, outside the Web Safe Color Palette can be chosen by clicking
from the color wheel on the colors dropdown palette, customize as
desired.
Web Safe Colors:
- Hexidecimal
Colors:
- The colors are based on RGB (Red, Green, Blue combinations).
Each component is assigned a value, which are all made up of 00,
33, 66, 99, cc and ff (code or digits). The 3 values are combined
into one value, which produces the color.
- These 216 colors are necessary to insure that colors selected
will display the same on multiple computer platforms and systems.
Set Preferences (Edit > Preferences): Allows
you to set up DW4 to function to preferred setting.
- Preview in Browser: Set Previewing Preferences
to Explore as default and Netscape as second.
- Status Bar: Set the Connection Speed to
28.8 Kilobits per second.
In-Class Exercises:
Answer these questions
- What is the Document Window used for?
- What is the purpose of the Properties Inspector?
- What is the Object Palette used for?
- What if the floating Launcher Bar is closed, where
can you access the icons from the Launcher Bar?
- How do you access a Context Menu?
- How can you change the screen viewing size in DW4?
- How can you tell the current size or weight of your
web page?
|
 |
|
Setting
Up A New Site and Document (Chapter 5 - Dreamweaver 4)
New Site:
- On your local drive (A drive, floppy disk) make a new folder which
will hold all the files used to make a new web site, name it appropriately.
- Add sub-folders, naming them, 'images' and 'animations' (these
are where your images and animations should be kept).
- Then back to DW4.
- Site >New Site > Site Definition for Unnamed Site 1 dialoge
box appears.
- Name the site.
- Local Root Folder: Direct DW4 to the folder for your new site on
the floppy disk (local files). Use the Yellow folder to search for
the correct path.
- Type in the full URL which is the address of the site. This is not
required.
Creating, opening and saving HTML Documents:
- New Blank Document: File > New
- Open Existing Document: File > Open
- From a existing Template: File > New from Template
- Saving: File > Save or Control > S
Setting Document Properties: Modify > Page Properties:
- Title:
- Define Background image or Color:
- Define default text colours:
Using Visual Guides for Designing:
- Rules: View > Rules > Show
- Trace Image: View > Tracing Image > Load or through
Page Properties.
- use the sample image tombstone1 copy.jpg
- Grids: View > Grid > Show Grid
|
|
|
Inserting & Formatting
Text (Chapter 10 - Dreamweaver 4)
Inserting Text, Lists and much more:
- Text: Type text directly in the document window, wherever
the cursor is located. With any text selected in
Document Window, view the properties of the text in the Properties
Inspector as it is now text sensitive.
- About Fonts:
<font>some text</font>
- Use well know fonts, for text, on web sites
as most computer have these fonts stored locally.
- In DW4, you can choose between several
sets of fonts from the Text Drop Down list.
- They are listed in sets of three:
- If the first font is not available,
on the users system, the second choice will be use,
and then the third, in turn.
- The default font is set on the users computer.
- Times
New Roman is a "Serif Font"
- Arial
is a "san serif font".
- Font Style: Property Inspector.
<font type="default font">some text</font>
- Choose from the Text Drop Down list.
- Font Size: Property Inspector.
<font size="4">some text</font>
- Choose from the Font Size drop down list.
- size 2 is equal to 10 point font.
- size 3 is equal to 12 point font.
- size 4 is equal to 14 point font.
- Headings: Property Inspector.
<h>some text</h>
- Choose from several default sizes for a selected group
of heading text.
- Paragraph: Property Inspector.
<p>Type the text of your paragraph here (no closing tag
needed).
- Adds a line space between text groups.
- Color of Text: Property Inspector
<font color="#3366CC">some text</font>
/ Hexidecimal
Colors:
- The colors are based on RGB (Red, Green,
Blue combinations). Each component is assigned a value,
which ranges from 00 to FF. The 3 values are combined into
one value, which produces the color.
- 216 colors
- Most important - they should be easy to
read.
- Align Text: Property Inspector.
<p align="right, center, or left (default)">some
text (no closing tag needed).
- Left, Right and Centered.
- Indent.
<p></blockquote>Some text</blockquote>
- Justified Text.
<pre>some text </pre>
- Optional Area: Additional Character
Formatting can be found from the tool bar, select the TEXT Drop
Down list and choose from the selections.
- Lists: Lists help to organize any text. There are five
(5) types of list, however, we only use these first three (3).
- Unordered List: Property Inspector
- <UL><LI></LI></UL>
- Attribute: select the style of bullet or
number using the following code typed into the List tag.
TYPE="Value"
- Values: "bullet", "circle",
"square".
- Access the List Property menu by right
mouse clicking with in the list, then, select List / Properties.
- Ordered List: Property Inspector
- <OL><LI></LI></OL>
- Attribute: type="_" and/or start="_"
(which allows you to start the list with whatever # or letter
you like).
- Values: Number = "1", Roman Small
= "i", "Roman Large = "I", Alpha
Small = "a", Alpha Large = "A".
- Access the List Property menu by right
mouse clicking with in the list, then, select List / Properties.
- Definitions List: Property Inspector
- Sets list of word or statements with an
indented definition description, but without bullets or
numbers.
- Only one indent (description) can follow
the term to be defined.
- Directory List:
- Similar to Unordered List and not supported
by most browsers
- Menu List:
- Similar to Unordered List and not supported
by most browsers
- Nesting Lists:
- Placing a list inside a list.
- Date: Object Palette or
- Insert > Date
October 22, 2001 7:22 PM
.
- Horizontal Rules:
<hr width="60%">
- Insert > Horizontal Rule.
- Line Break:
<br>
Inserts a line space (line break) with the tag <br> or through
the Object Palette > Character Category.
- Bold Font:
<b>some text</b>
- In-Class Exercises:
- Answer these questions:
- Why does DW4 list three font-faces when designating
a desired font?
- How do the standard default size values of
text in HTML relate to print media?
- If the Properties Inspector is missing how
do you find it?
- Can Text be Justified?
- Why do we use standard font faces in web
sites?
- What are the differences between serif (with
small extensions to letters) and san serif fonts?
- Learn more about web
fonts.
- What are the three (3) standard list types?
- Give examples of each of their uses?
- How do you change the bullet or number (prefix)
style in DW4?
- How do you change the start value of an ordered
list?
- What is meant by the term "nested lists"?
- What is the name of the menu used to edit
the properties of a list?
- How do you find it?
- What are the three values of the unordered
list
|
|
|
Choose a Web Hosting Service
Each student will be responsible / required to
sign up for a web hosting service. We will be using this service to
locate our project and homework. It doesn't matter which service you
choose as long as they allow you to FTP (File Transfer Protocal) file
when required. See the Resources page for
suggestions for a Free web site hosting company.
|
|
|
Home Work Exercise 2:
- Sign up for a free Web-hosting service.
- See the Resources
page for suggestions for a Free web site hosting company.
- Bring codes, passwords to class.
- ***NOTE**** Do not leave
this Exercise to Sunday Night !
- It takes a day (and sometimes more) to just
get signed up for the service.
- Don't waste too much time signing up with one
service.
- If you are having trouble and its taking too
long, move onto another service.
- Format text and upload to your web-hosting site
- Download, from the Week 2
section of the downloads page, the file
called "Class_2_Editing_text.txt".
- Read the downloading instruction for help.
- Copy the text into the body of a new document
in DW4 and save the new document as "index.html",
locally.
- Ensure you place the correct title of the page,
"Home Work Exercise 2", in the correct area.
- Now, edit the text file to match the printed handout
given at the end of Class 2.
- Once completed, upload this page to your free web
site.
- Check to ensure it is up and correct (view live
on the net).
- E-mail a link (the address of the free web site)
to this page to ec106@npconsultants.com
before Class 3.
***NOTE****
The purpose of this exercise is to get you familiar
with uploading to a hosting service and editing text in DW4.
Download (print if needed) the Dreamweaver
4 PDF. This is your reference while going through DW4.
Find time to Explore DW4.
Revisit HTML tutorial: http://www.davesite.com/webstation/html/
Chapters 4 to 8.
|
|
Class
1 / Class
2 / Class 3 / Class
4 / Class 5 / Class
6 / Class 7 / Class
8 / Class 9 / Class
10 / Terms
|
|


 fig.#1
 fig.#2


